Developer Guide
Contents
- Quick Start
- Design
- Implementation
- Additional guides
- Appendix: Requirements
-
Appendix: Instructions for manual testing
- Launch and shutdown
- Saving data
- Adding a contact
- Blacklisting or un-blacklisting a contact
- Blacklisting or un-blacklisting multiple contacts
- Changing to dark mode
- Changing to light mode
- Collecting details from all listed contacts
- Deleting a contact
- Deleting multiple contacts
- Editing remark for a contact
- Finding contacts
- Navigating through commands
- Sorting entries by name
- Undoing previous operations
Setting up, getting started
Refer to the guide Setting up and getting started.
Design
Architecture

The Architecture Diagram given above explains the high-level design of the App. Given below is a quick overview of each component.
.puml files used to create diagrams in this document can be found in the diagrams folder. Refer to the PlantUML Tutorial at se-edu/guides to learn how to create and edit diagrams.
Main has two classes called Main and MainApp. It is responsible for,
- At app launch: Initializes the components in the correct sequence, and connects them up with each other.
- At shut down: Shuts down the components and invokes cleanup methods where necessary.
Commons represents a collection of classes used by multiple other components.
The rest of the App consists of four components.
-
UI: The UI of the App. -
Logic: The command executor. -
Model: Holds the data of the App in memory. -
Storage: Reads data from, and writes data to, the hard disk.
Each of the four components,
- defines its API in an
interfacewith the same name as the Component. - exposes its functionality using a concrete
{Component Name}Managerclass (which implements the corresponding APIinterfacementioned in the previous point.
For example, the Logic component (see the class diagram given below) defines its API in the Logic.java interface and exposes its functionality using the LogicManager.java class which implements the Logic interface.

How the architecture components interact with each other
The Sequence Diagram below shows how the components interact with each other for the scenario where the user issues the command delete 1.

The sections below give more details of each component.
UI component

API :
Ui.java
The UI consists of a MainWindow that is made up of parts e.g.CommandBox, ResultDisplay, PersonListPanel, StatusBarFooter etc. All these, including the MainWindow, inherit from the abstract UiPart class.
The UI component uses JavaFx UI framework. The layout of these UI parts are defined in matching .fxml files that are in the src/main/resources/view folder. For example, the layout of the MainWindow is specified in MainWindow.fxml
The UI component,
- Executes user commands using the
Logiccomponent. - Listens for changes to
Modeldata so that the UI can be updated with the modified data.
Logic component

API :
Logic.java
-
Logicuses theAddressBookParserclass to parse the user command. - This results in a
Commandobject which is executed by theLogicManager. - The command execution can affect the
Model(e.g. adding a person). - The result of the command execution is encapsulated as a
CommandResultobject which is passed back to theUi. - In addition, the
CommandResultobject can also instruct theUito perform certain actions, such as displaying help to the user.
Given below is the Sequence Diagram for interactions within the Logic component for the execute("delete 1") API call.

DeleteCommandParser should end at the destroy marker (X) but due to a limitation of PlantUML, the lifeline reaches the end of diagram.
Model component

API : Model.java
The Model,
- stores a
UserPrefobject that represents the user’s preferences. - stores the address book data.
- exposes an unmodifiable
ObservableList<Person>that can be ‘observed’ e.g. the UI can be bound to this list so that the UI automatically updates when the data in the list change. - does not depend on any of the other three components.
Tag list in the AddressBook, which Person references. This allows AddressBook to only require one Tag object per unique Tag, instead of each Person needing their own Tag object.
Storage component

API : Storage.java
The Storage component,
- can save
UserPrefobjects in json format and read it back. - can save the address book data in json format and read it back.
Common classes
Classes used by multiple components are in the seedu.addressbook.commons package.
Implementation
This section describes some noteworthy details on how certain features are implemented.
Blacklist feature
The blacklist mechanism is facilitated by Person.
It represents if a Person is blacklisted or not, stored internally by adding a Blacklist object to the parameters of Person.
Blacklist status is displayed externally via the background colour of a contact (black represents blacklisted, non-black represents un-blacklisted).
Given below is an example usage scenario.
Step 1. The user executes add n/David … to add a new person.
A new Person is created, with the default status of un-blacklisted.
It is then added to AddressBook.

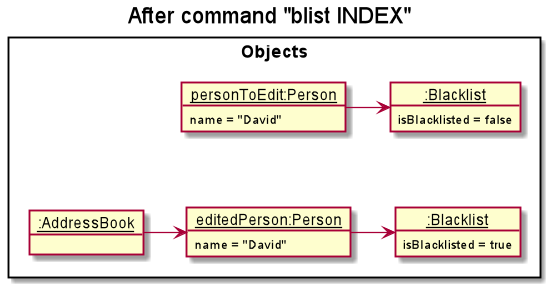
Step 2. The user decides to blacklist the person, and executes the blist INDEX command.
The blist INDEX command will create a new Person with the same information as the person at INDEX in AddressBook,
but with a new Blacklist with a different blacklist status, which then replaces the original person.
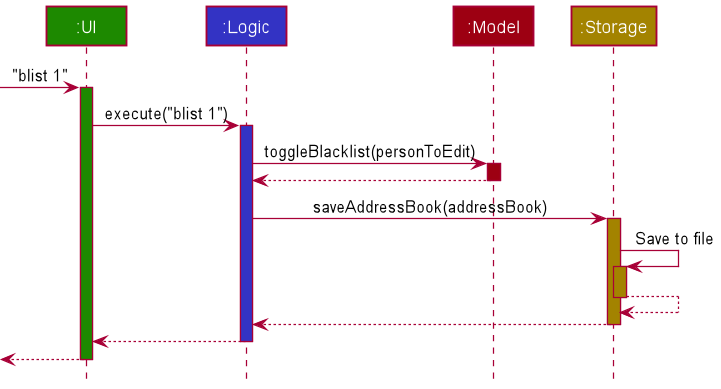
The following sequence diagram shows how the blacklist operation works:
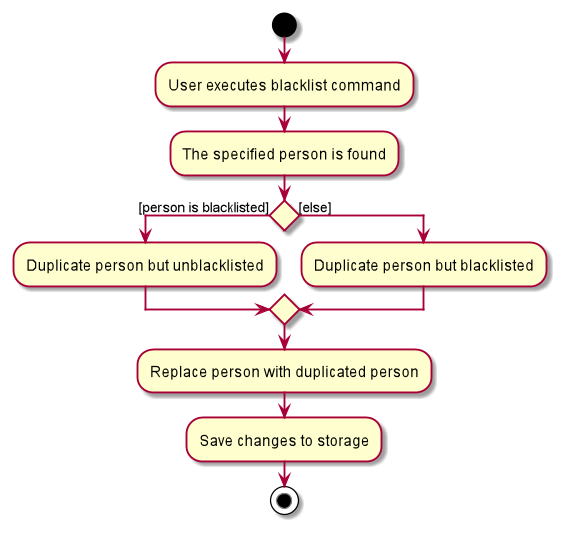
The following activity diagram summarizes what happens when a user executes a blacklist command:
Design considerations:
Aspect: The command format of blacklist
-
Alternative 1 (current choice):
blist INDEXto toggle blacklist status.- Pros: Easier to remember, faster to type. More straightforward and logical for a value with only 2 states.
- Cons: Requires checking current blacklist status.
-
Alternative 2:
+blist INDEXto blacklist,-blist INDEXto un-blacklist.- Pros: Able to directly set blacklist status without checking current status.
- Cons: More commands to remember.
Collect feature
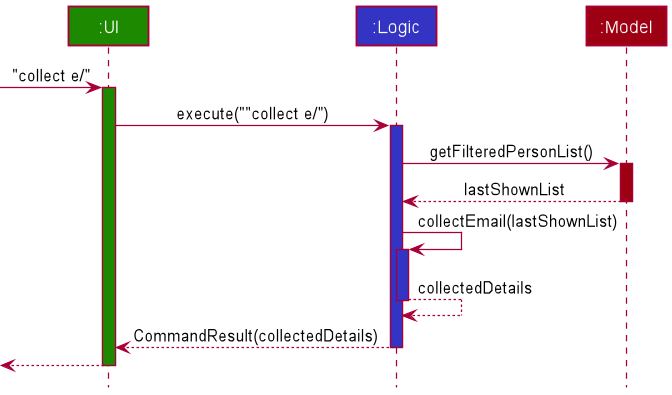
The collect feature is facilitated by CommandResult, which is responsible for displaying the results after
collecting the details. Currently, only details from the 4 main fields (name, phone, address, email)
can be collected.
The following sequence diagram shows how the collect command works.
Design considerations:
Aspect: The number of fields to be collected from
-
Alternative 1 (current choice): Exactly 1 field out of 4 possible choices.
- Pros: Simpler and more intuitive command format. Usually only 1 field is needed at a time when copying to messaging applications.
- Cons: Not customisable for all needs.
-
Alternative 2: Exactly 1 field out of all existing fields.
- Pros: Able to be used for more situations.
- Cons: More complex command format for likely unnecessary details.
Aspect: The ability to start or end the separator with blank space
-
Alternative 1 (current choice): Leading or trailing blank space is ignored.
- Pros: Easier to implement due to reuse of
ArgumentTokenizer. Blank space is not the main separator in the recipient list for most messaging applications, so functionality is not significantly impacted. - Cons: Collected details are not in reader-friendly format.
- Pros: Easier to implement due to reuse of
-
Alternative 2: Include all leading and trailing blank spaces
- Pros: Able to be used for more situations.
- Cons: More complicated implementation resulting in possibly more bugs.
Finding contacts by details
This feature is built on the current find command, which is used to be limited to only finding persons by names. With this change, the format of the find command is now modified to find n/[NAME] t/[TAG] a/[ADDRESS] p/[PHONE] e/[EMAIL] b/[IS_BLACKLISTED] m/[MODE_OF_CONTACT].
This command returns the persons with attributes that matches at least one of the attributes of interest (See User Guide for more details).
Note that users are only required to provide at least one of the parameters to use this command. In other words, commands such as find n/Alex and find t/autistic are valid commands.
To facilitate the implementation of this feature, several new predicate classes are introduced, for instance, PersonTagContainsKeywordsPredicate AddressContainsKeywordsPredicate, ReturnTruePredicate etc. Of course, As the name suggests, ReturnTruePredicate always returns true.
The introduction of ReturnTruePredicate may seem pointless, but it is of great use. The key here is to realize that if X is a boolean variable, then X and true simplifies to X. If all keywords are given, the FindCommand class will receive all the predicates. If, say, only name keywords are given, then rest of the predicates will be replaced with ReturnTruePredicates. As such, the filter will now solely depend on NameContainsKeywordsPredicate since the other predicates always returns
true.
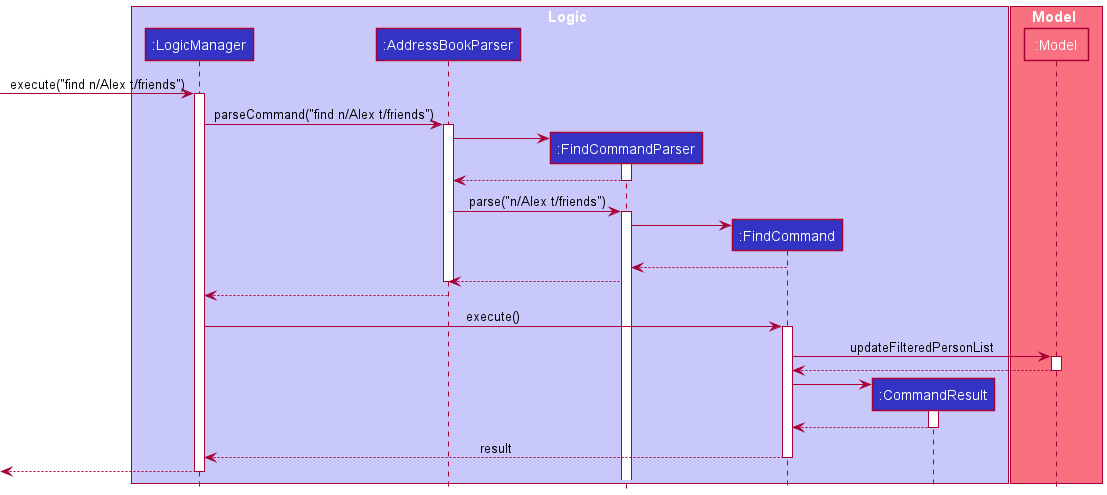
The following sequence diagram shows how the find command works:
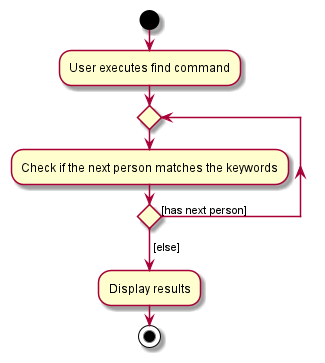
The following activity diagram shows what happens when find command is executed.
Design considerations:
Aspect: Command design
-
Alternative 1 (current choice):
findcommand alone supports finding by the different fields.- Pros: More intuitive to use since most commands have similar format. Makes further extensions easier as developers only need to define a new predicate class.
- Cons: Can make debugging harder since further extensions are centralized into one class.
-
Alternative 2: Find by names and find by tags are separate commands.
- Pros: Easier to debug as one command is meant for one criterion.
- Cons: It is now not possible to combine both criteria together. More commands to remember. Due to similarity of the commands, they can be confused from one another.
Light Feature
The light feature is implemented in the LightCommand class.
The following is an example usage scenario.
Step 1: The user executes light to switch the current theme to a light theme.
The UI component then passes the string to the LogicManager class in Logic component.
Step 2: The Logic component executes the command which changes the boolean light to true. This is passed back to the UI component.
Step 3: The UI component loads the fxml file containing the light theme and is displayed back to the user.
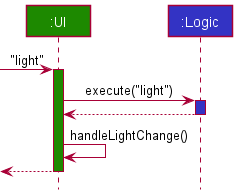
The following sequence diagram shows how the light command works:
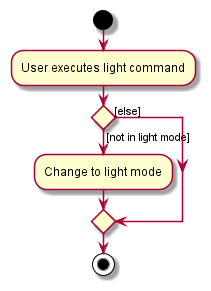
The following activity diagram shows what happens when a user executes the light command:
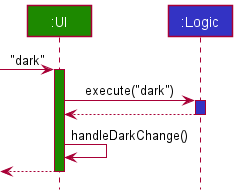
Dark Feature
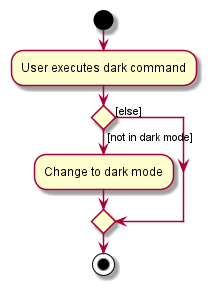
The dark feature is implemented in the DarkCommand class.
The following is an example usage scenario.
Step 1: The user executes dark to switch the current theme to a dark theme.
The UI component then passes the string to the LogicManager class in Logic component.
Step 2: The Logic component executes the command which changes the boolean dark to true. This is passed back to the UI component.
Step 3: The UI component loads the fxml file containing the dark theme and is displayed back to the user.
The following sequence diagram shows how the dark command works:
The following activity diagram shows what happens when a user executes the dark command:
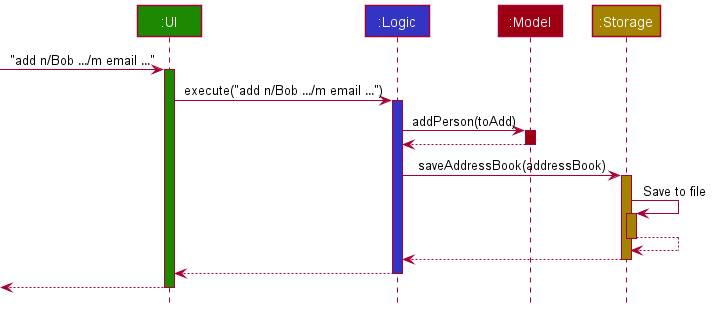
Mode of Contact feature
The mode of contact feature is built on the current AddCommand class.
The following is an example usage scenario.
Step 1: The user executes add n/Bob …/m email … to add a new Person with the mode of contact as email.
The UI component then passes the string to the LogicManager class in Logic component.
Step 2: The Logic component parses the string and creates an AddCommand object.
Step 3: The LogicManager class then executes the AddCommand object, which calls all the appropriate methods including mode of contact in the Model component.
Step 4: The Model component adds the inputted string and the appropriate method in the Storage component is executed to update the file.
Step 5: The Model component passes the CommandResult to the Logic component, which is then passed to the UI component to display to the user.
The following sequence diagram shows how the add command works:
Mass Blacklist feature
The mass blacklist/un-blacklist mechanism is facilitated by MassBlacklistCommand.
Below is an example usage scenario for mass blacklist.
Step 1: The user executes massblist 2-5 b/blacklist to blacklist all contacts within the index range 2-5.
The string is passed to the Logic component.
Step 2: The Logic component parses the string and creates a corresponding MassBlacklistCommand object.
Step 3: The MassBlacklistCommand object calls Model#massBlacklist(2,5) to blacklist all contacts
in the AddressBook with index between 2 to 5.
Step 4: After the contacts have been blacklisted, filteredPersons in ModelManager is updated to reflect the change.
The following sequence diagram illustrates how the mass blacklist operation works:
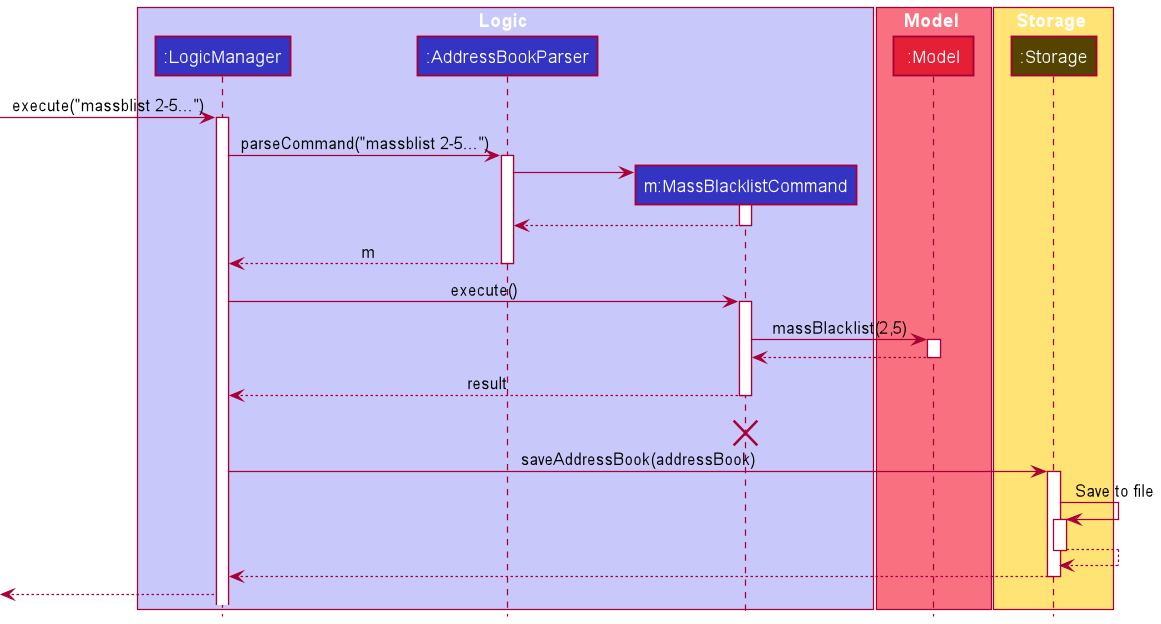
MassBlacklistCommand
should end at the destroy marker (X) but due to a limitation of PlantUML, the lifeline reaches the end of diagram.
The following activity diagram summarizes what happens when a user executes a mass blacklist command:
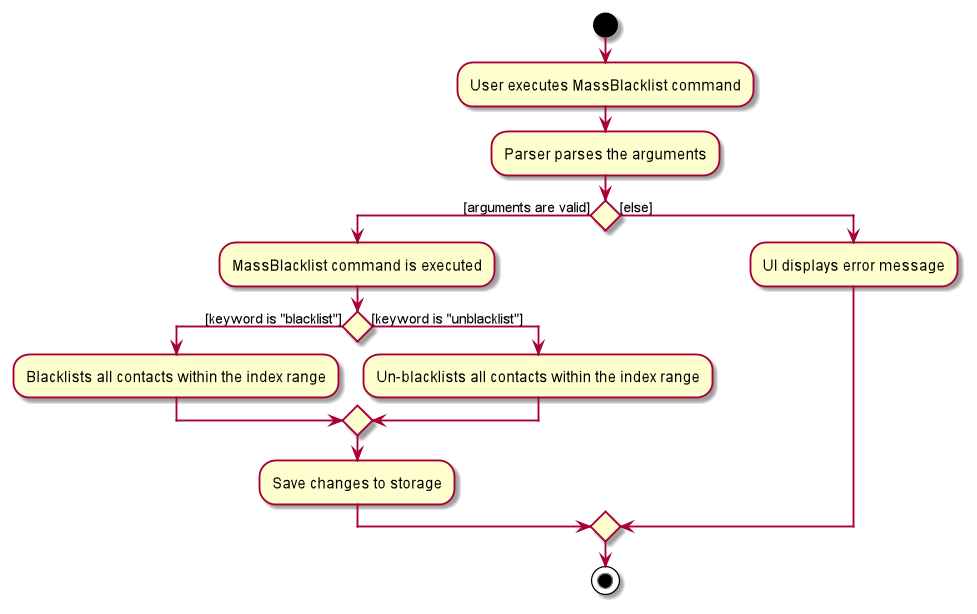
Design considerations:
Aspect: Inheritance or no inheritance with MassDeleteCommand
-
Alternative 1 (current choice): Implement
MassBlacklistCommandas a separate class.- Pros: Easier to implement. Code is also shorter.
- Cons: This implementation is difficult to extend to other mass operations in the future.
-
Alternative 2: Create a
MassCommandclass and letMassBlacklistCommandandMassDeleteCommandinherit fromMassCommand.- Pros: Certain parts of the code can be reused for other mass operation commands in the future.
- Cons:
MassBlacklistCommandandMassDeleteCommanddiffer in significant ways and only a small portion of the code is shared. This implementation makes the code much longer and adds even more classes to the commands package.
Mass Delete feature
The mass delete mechanism is facilitated by MassDeleteCommand.
Below is an example usage scenario.
Step 1: The user executes massdelete 2-5 to delete all contacts within the index range 2-5.
The string is passed to the Logic component.
Step 2: The Logic component parses the string and creates a corresponding MassDeleteCommand object.
Step 3: The MassDeleteCommand object calls Model#massDelete(2,5) to delete all contacts
in the AddressBook with index between 2 to 5.
Step 4: After deletion, filteredPersons in ModelManager is updated to reflect the change.
The following sequence diagram illustrates how the mass delete operation works:
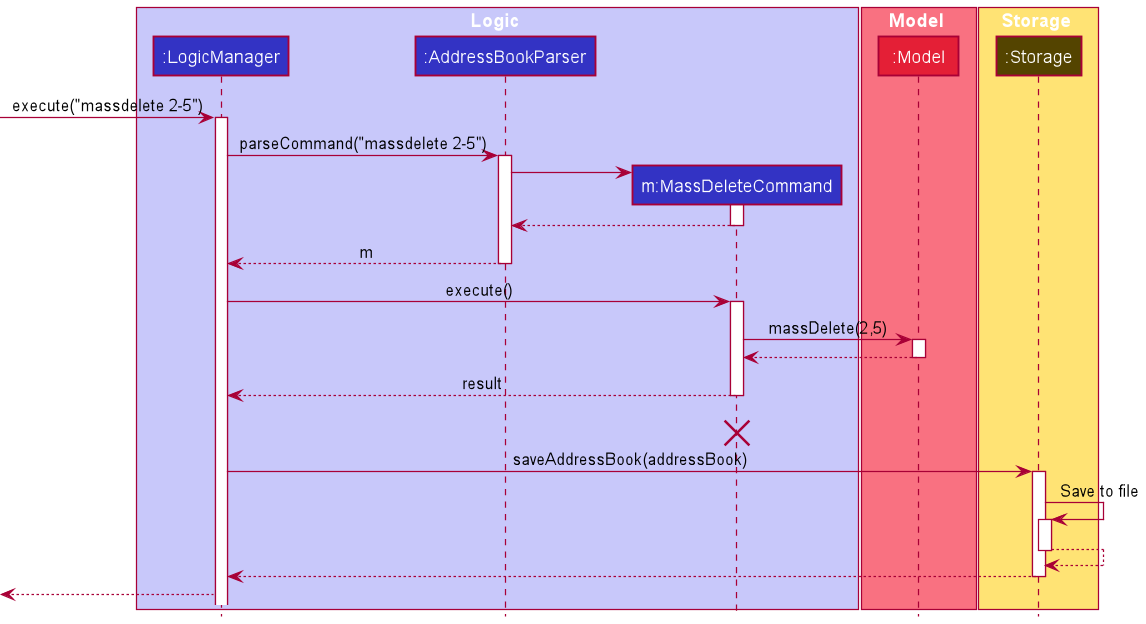
MassDeleteCommand
should end at the destroy marker (X) but due to a limitation of PlantUML, the lifeline reaches the end of diagram.
The following activity diagram summarizes what happens when a user executes a mass delete command:
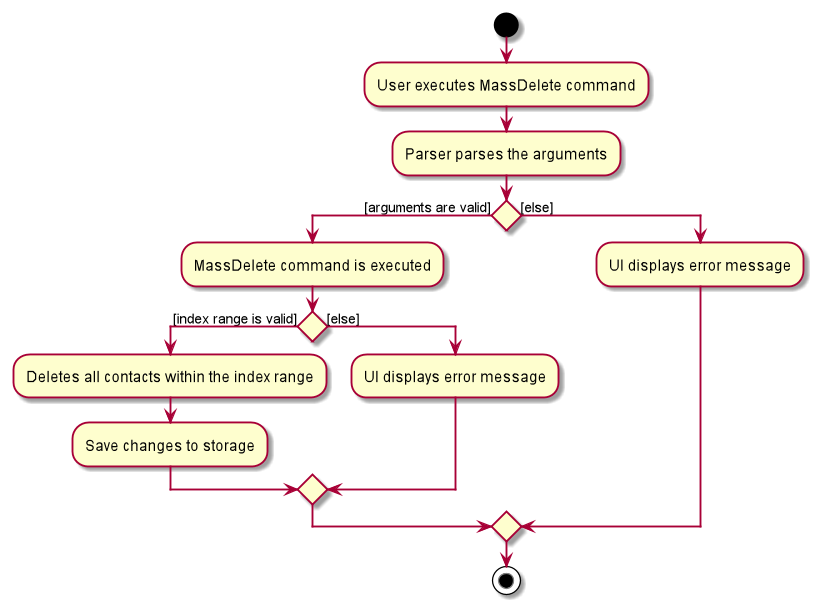
Design considerations:
Aspect: Input format
-
Alternative 1 (current choice): Input format is
massdelete START-END.- Pros: More inutitive for the user.
- Cons: More difficult to implement as new methods will have to be written to parse the hyphen (-) symbol.
-
Alternative 2: Input format is
massdelete start/START end/END.- Pros: Easier to implement as the existing
ArgumentMultimapandCliSyntaxclasses are well-suited to parse such input formats. - Cons: There are more prefixes for the user to remember.
- Pros: Easier to implement as the existing
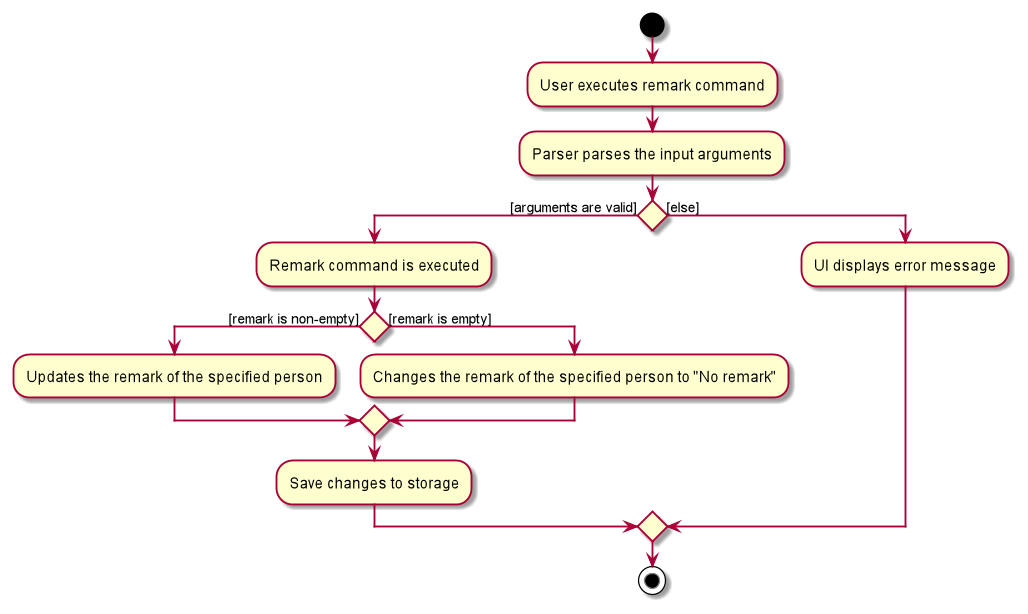
Remark feature
The Remark feature is facilitated by the classes Remark and RemarkCommand.
Below is an example usage scenario.
Step 1: The user executes add n/John Doe... to add a new contact. This creates a new Person object. By default,
the new contact is displayed as having “No remark”.

Step 2: The user now decides to add a new remark to the new contact by executing remark 3 r/Absent.
The Logic component creates a new RemarkCommand object for execution.
Step 4: RemarkCommand creates a new Person object which is identical to the original Person object in
every field except that the Remark of the new Person object have been updated.
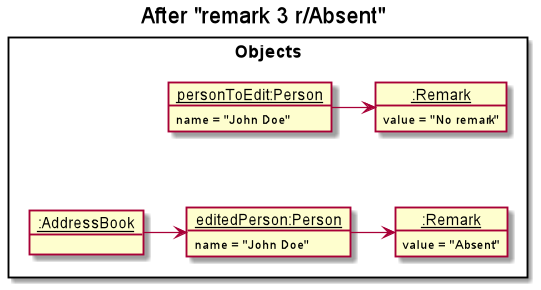
Step 5: RemarkCommand calls Model#setPerson() to replace the original Person in the AddressBook with the new
Person.
The following activity diagram summarizes what happens when a user executes a remark command:
Design considerations:
Aspect: Implementation of remark
-
Alternative 1 (current choice): Editing the
Remarkfield is done in a separate command.- Pros: Reduces coupling and increases abstraction. Code for the
Remarkcommand can be reused elsewhere. - Cons: More commands for the user to remember.
- Pros: Reduces coupling and increases abstraction. Code for the
-
Alternative 2: Use the existing
Editcommand to edit theRemarkfield.- Pros: Easier to implement as the edit command already has a parser and many helper methods.
- Cons: The edit command is already the largest class in the
commandspackage. Adding more code will make the class even bigger and thus more difficult to maintain.
Navigate previous commands feature
Implementation
The implementation of this feature is facilitated by CommandList class, which is a self-implemented linked list class.
Whenever a command is executed, regardless of validity, a new node containing the command will be created and added into the linked list.
The nodes in the linked list are implemented using CommandNode class, which keeps track of the following information:
- Command executed
- A reference to the previous
CommandNodein the linked list. - A reference to the next
CommandNodein the linked list.
In addition, a cursor is introduced in CommandList class to help with navigation of the commands.
The cursor keeps track of the current command while users are traversing through the commands using up and down arrow keys.
Its position will be reset to the newly added CommandNode, which is the last node in the list, once a new command has been executed.
When the user presses the up arrow key, there are two possible scenarios:
- The
cursoris at the first node in the list.- Nothing happens.
- The
cursoris not at the first node in the list.- The
cursoris moved to the previous node and a new command is retrieved.
- The
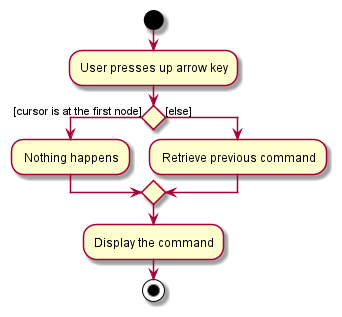
Similarly, when the user presses the down arrow key, there are two possible scenarios:
- The
cursoris at the last node in the list.- Nothing happens.
- The
cursoris not at the last node in the list.- The
cursoris moved to the next node and a new command is retrieved.
- The
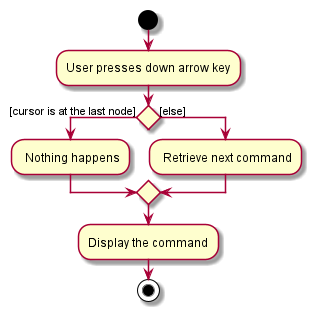
Design considerations:
Aspect: Data structure used to model the list of commands
-
Alternative 1 (Current choice): Use a self-implemented linked list.
- Pros: More control on the implementation. Cursor lies on the element themselves.
- Cons: Higher chance of errors in implementation, especially when it comes to addition of nodes.
-
Alternative 2: Use the
LinkedListclass provided by Java.- Pros: Easier implementation. Most operations have been provided by Java.
- Cons: Need to devise a workaround to traverse the commands since the
ListIteratorplaces the cursor in between the elements.
Sort feature
The sort mechanism is facilitated by SortCommand.
Below is an example usage scenario.
Step 1: The user executes sort ascending to sort the contact list by name in ascending order. The
string is passed to the Logic component.
Step 2: The Logic component parses the string and creates a corresponding SortCommand object.
Step 3: The SortCommand object calls Model#sortByName() to sort the
internal AddressBook.
Step 4: After sorting, filteredPersons in ModelManager is updated to reflect the change.
The following sequence diagram illustrates how the sort operation works:
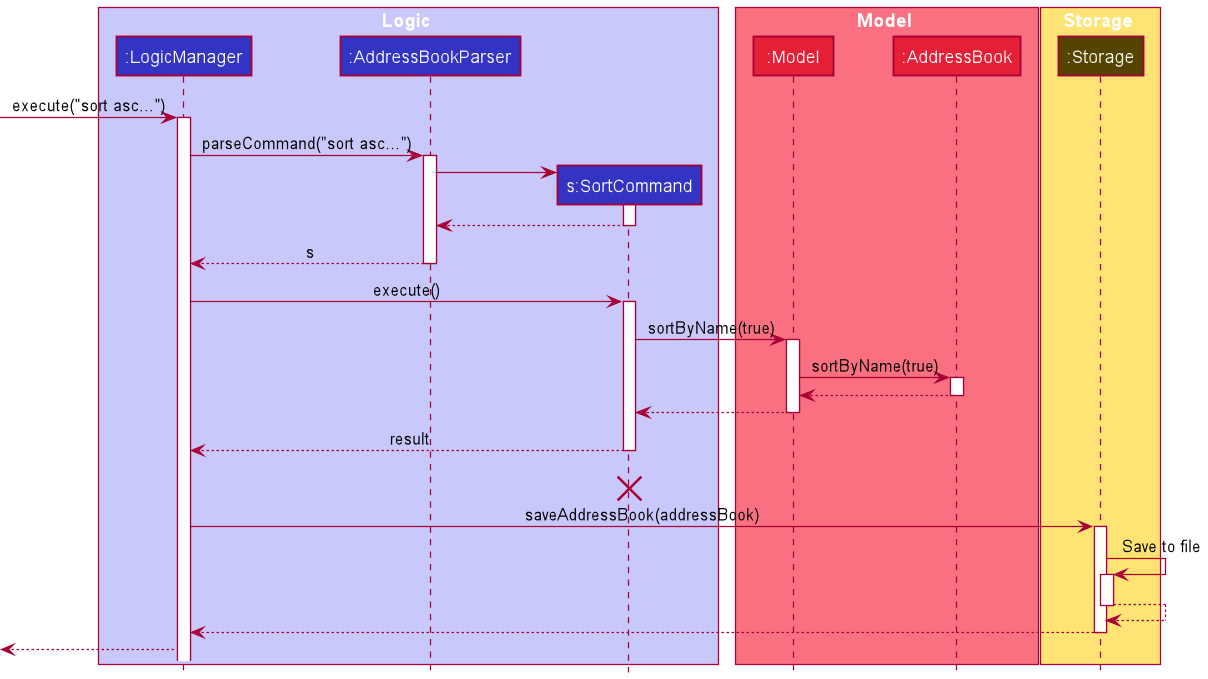
SortCommand should end
at the destroy marker (X) but due to a limitation of PlantUML, the lifeline reaches the end of diagram.
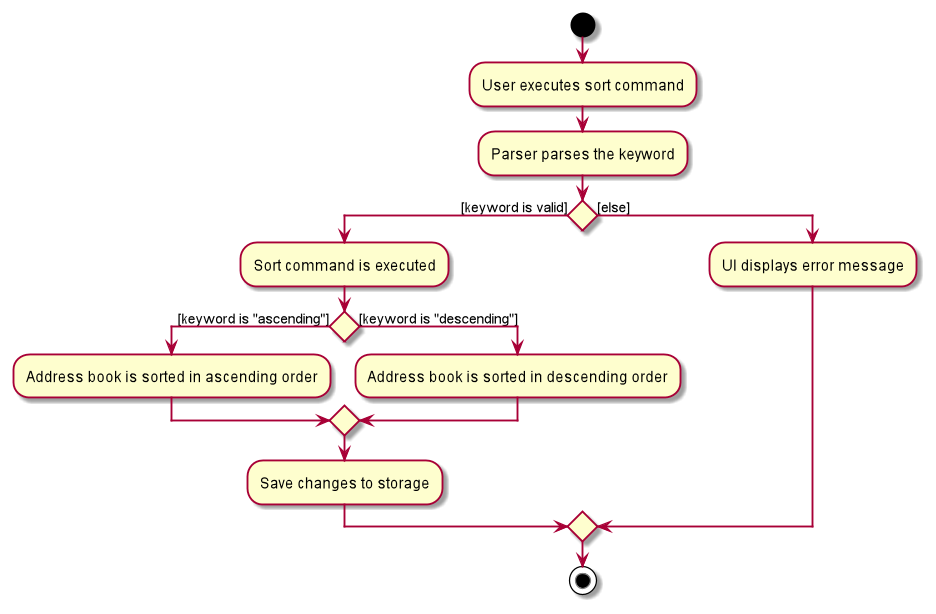
The following activity diagram summarizes what happens when a user executes a sort command:
Design considerations:
Aspect: Sort input format
-
Alternative 1 (current choice):
sort ascendingandsort descending- Pros: Easier for the user to remember.
- Cons: Difficult to extend the command to accept more parameters.
-
Alternative 2:
sort d/ascendingandsort d/descending- Pros: This implementation makes it easier to extend the command in the future to accept more parameters. For example,
sort
c/modeofcontact c/name d/descending
is a possible format that can be used to sort the list firstly by mode of contact then by name in descending order. - Cons: Not as user friendly as the user will have to remember more commands.
- Pros: This implementation makes it easier to extend the command in the future to accept more parameters. For example,
Undo feature
Implementation
The undo mechanism is facilitated by State class. It contains a list of AddressBookCommandPairs, which are made up of the state of AddressBook and the command executed.
They are stored internally as addressBookStates. Additionally, it implements the following operations:
-
State#addState()— Saves a newAddressBookCommandPairin its history. -
State#deleteState()— Deletes the lastAddressBookCommandPairin the list. The undo operation is done by calling this method.
Given below is an example usage scenario and how the undo/redo mechanism behaves at each step.
Step 1. The user launches the application for the first time. The State will be initialized with the initial AddressBookCommandPair. Since no command is executed, the command stored in the pair will be an empty string.

Step 2. The user executes delete 5 command to delete the 5th person in the contact list. After execution, State#addState() is called, causing the modified state of the contact list after the delete 5 command executes to be saved in the addressBookStates.

Step 3. The user executes add n/David … to add a new person. This causes another modified contact list state to be saved into the addressBookStateList.

State#addState(), so the contact list state will not be saved into the addressBookStates.
Examples of commands that do not modify the list include find, list etc.
Step 4. The user now decides that adding the person was a mistake, and decides to undo that action by executing the undo command. The undo command will first call State#deletePreviousState() to delete pair2 and then call model#setAddressBook to set the contact list to be the same AddressBook as in pair1.

addressBookStates, then there are no previous AddressBook states to restore. The undo command uses State#getPreviousState to check if this is the case. If so, the method will return null
, causing the command to return an error to the user rather than attempting to perform the undo.
The following sequence diagram shows how the undo operation works:

UndoCommand should end at the destroy marker (X) but due to a limitation of PlantUML, the lifeline reaches the end of diagram.
The following activity diagram summarizes what happens when a user executes a new command:

Design considerations:
Aspect: How undo executes
-
Alternative 1 (current choice): Saves the entire contact list.
- Pros: Easy to implement.
- Cons: May have performance issues in terms of memory usage.
-
Alternative 2: Individual command knows how to undo/redo by
itself.
- Pros: Will use less memory (e.g. for
delete, just save the person being deleted). - Cons: We must ensure that the implementation of each individual command are correct.
- Pros: Will use less memory (e.g. for
Documentation, logging, testing, configuration, dev-ops
Appendix: Requirements
Product scope
Target user profile:
- has a need to manage a significant number of contacts
- prefer desktop apps over other types
- can type fast
- prefers typing to mouse interactions
- is reasonably comfortable using CLI apps
- is using a single monitor setup
- is an NUS Computer Science undergraduate
- works in the NUS Office of Campus Amenities communications team
Value proposition: OCA has a wide range of information to disseminate to students / staff at NUS. The large number of emails to send, and the large student / staff population may introduce errors during dissemination. We aim to help them classify this information based on the relevant parties and the required means of communication.
User stories
Priorities: High (must have) - * * *, Medium (nice to have) - * *, Low (unlikely to have) - *
| Priority | As a … | I want to … | So that I can… |
|---|---|---|---|
* * * |
new user | see usage instructions | refer to instructions when I forget how to use the app |
* * * |
user | add a new contact | |
* * * |
user | delete a contact | remove contacts that I no longer need |
* * * |
user | list all contacts | see the full list of my contacts |
* * * |
user | edit a contact | keep my contact list up-to-date |
* * * |
user | find contacts by keywords | minimize time spent to find the contacts I need |
* * * |
user | specify preferred mode of contact | maximize chance of recipient seeing the information |
* * * |
user | blacklist a contact | reduce dissemination of information to people who do not want it |
* * * |
user | undo my operations | correct any recent mistakes |
* * * |
user | collect specified details of all contacts | reduce time spent copying details of each contact |
* * |
user | assign each contact an additional remark | note down specific details about certain contacts |
* * |
user | sort contacts by name | work with the contact list more easily |
* * |
user | delete multiple contacts at once | remove groups of unneeded contacts more efficiently |
* * |
user | blacklist multiple contacts at once | blacklist groups of contacts more efficiently |
* * |
user | review my previous commands | simply modify them instead of retyping the commands, especially for the commands with longer parameters list |
* * |
user | change between light and dark mode | reduce the strain on my eyes |
* * |
user | clear the entire contact list | start over from a new contact list |
Use cases
(For all use cases below, the System is SpamEZ and the Actor is the User, unless specified otherwise)
Use case: UC01 - Delete a person
MSS
- User requests to list contacts.
- SpamEZ shows a list of contacts.
- User requests to delete a specific contact in the list.
-
SpamEZ deletes the contact.
Use case ends.
Extensions
-
2a. The list is empty.
Use case ends.
-
3a. The given index is invalid.
-
3a1. SpamEZ shows an error message.
Use case resumes at step 2.
-
Use case: UC02 - Filter contacts by tags
MSS
- User requests to list contacts.
- SpamEZ shows a list of contacts.
- User requests to find the contacts using name and/or tags.
-
SpamEZ returns a filtered list of contacts.
Use case ends.
Extensions
-
2a. The list is empty.
Use case ends.
-
3a. No keywords are given or invalid syntax.
-
3a1. SpamEZ shows an error message.
Use case resumes at step 2.
-
Use case: UC03 - Specify a preferred mode of contact for a contact
MSS
- User requests to list contacts.
- SpamEZ shows a list of contacts.
- User requests to edit the preferred mode of contact for a contact.
-
SpamEZ edits the contact.
Use case ends.
Extensions
-
2a. The list is empty.
Use case ends.
Use case: UC04 - Blacklist a contact
MSS
- User requests to list contacts.
- SpamEZ shows a list of contacts.
- User requests to change the blacklist status of a specific contact in the list.
-
SpamEZ changes the blacklist status of the contact.
Use case ends.
Extensions
-
2a. The list is empty.
Use case ends.
-
3a. The given index is invalid.
-
3a1. SpamEZ shows an error message.
Use case resumes at step 2.
-
Use case: UC05 - Add a remark to a contact
MSS
- User requests to list contacts.
- SpamEZ shows a list of contacts.
- User requests to add a remark to a specific contact in the list.
- SpamEZ adds the remark to the specific contact.
-
SpamEZ shows the updated list of contacts.
Use case ends.
Extensions
-
3a. The given index is invalid.
-
3a1. SpamEZ shows an error message.
Use case resumes at step 3.
-
-
3b. The contact already has a remark.
-
3b1. The old remark is replaced with the new remark.
Use case ends.
-
Use case: UC06 - Sort contacts by name
MSS
- User requests to sort the contact list by name in ascending alphabetical order.
- SpamEZ sorts the contact list.
-
SpamEZ displays the updated contact list.
Use case ends.
Extensions
- 1a. The contact list currently being displayed is not the full contact list.
- 1a1. SpamEZ will sort both the full contact list and the currently displayed contact list.
-
1a2. SpamEZ displays the updated partial contact list.
Use case ends.
Use case: UC07 - Mass blacklist contacts
MSS
- User requests to list contacts.
- SpamEZ shows a list of contacts.
- User requests to blacklist all contacts within a certain index range.
- SpamEZ blacklists all relevant contacts.
-
SpamEZ displays the updated contact list.
Use case ends.
Extensions
- 3a. The given index range is invalid.
-
3a1. SpamEZ shows an error message.
Use case resumes at step 2.
-
- 3b. All contacts within the index range have already been blacklisted.
-
3b1. SpamEZ displays the contact list (without any changes).
Use case ends.
-
Use case: UC08 - Mass delete contacts
MSS
- User requests to list contacts.
- SpamEZ shows a list of contacts.
- User requests to delete all contacts within a certain index range.
- SpamEZ deletes all relevant contacts.
-
SpamEZ displays the updated contact list.
Use case ends.
Extensions
- 3a. The given index is invalid.
-
3a1. SpamEZ shows an error message.
Use case resumes at step 2.
-
Use case: UC09 - Changing to light mode
MSS
- User requests to change mode of view to light mode.
- SpamEZ changes the mode of view to light mode.
Extensions
-
1a. SpamEZ is already in light mode.
Use case ends.
Use case: UC10 - Changing to dark mode
MSS
- User request to change mode of view to dark mode.
- SpamEZ changes the mode of view to dark mode.
Extensions
-
1a. SpamEZ is already in dark mode.
Use case ends.
Non-Functional Requirements
- Should work on any mainstream OS as long as it has Java
11or above installed. - Should be able to hold up to 1000 persons without a noticeable sluggishness in performance for typical usage.
- A user with above average typing speed for regular English text (i.e. not code, not system admin commands) should be able to accomplish most of the tasks faster using commands than using the mouse.
- Every command that is accessible via the graphical user interface should be possible using only command line inputs.
Glossary
- Mainstream OS: Windows, Linux, Unix, OS-X
Appendix: Instructions for manual testing
Given below are instructions to test the app manually.
Launch and shutdown
-
Initial launch
-
Download the jar file and copy it into an empty folder.
-
Double-click the jar file.
Expected: Shows the GUI with a set of sample contacts. The window size may not be optimum.
-
-
Saving window preferences
-
Resize the window to an optimum size. Move the window to a different location. Close the window.
-
Re-launch the app by double-clicking the jar file.
Expected: The most recent window size and location is retained.
-
Saving data
-
Dealing with missing/corrupted data files
-
Test case: Editing the data file to remove a name field to simulate a corrupted data file, while the app is not running.
Expected: Upon opening the app, there are no contacts in the GUI. -
Test case: Deleting the data file.
Expected: Upon opening the app, the default sample contacts are shown in the GUI.
-
Adding a contact
-
Adding a new contact
-
Test case :
add n/John Doe p/98765432 e/johnd@example.com a/311, Clementi Ave 2, #02-25 m/email t/friends t/owesMoney
Expected: New contactJohn Doeis added to the contact list. -
Test case:
add n/John Doe
Expected: No contact is added. Error details are shown in the status message.
-
Blacklisting or un-blacklisting a contact
-
Blacklisting or un-blacklisting a contact while some contacts are being shown
-
Prerequisites: List some contacts using the
listorfindcommands. At least 1 contact in the list. -
Test case:
blist 1
Expected: The blacklist status of the first contact is changed (from blacklisted to un-blacklisted or vice versa). Details of the updated contact are shown in the status message. -
Test case:
blist 0
Expected: No contact is edited. Error details are shown in the status message. -
Other incorrect blacklist commands to try:
blist,blist x,...(where x is larger than the list size).
Expected: Similar to previous.
-
Blacklisting or un-blacklisting multiple contacts
-
Blacklisting or un-blacklisting multiple contacts while some contacts are being shown
-
Prerequisites: List some contacts using the
listorfindcommands. At least 2 contacts in the list. -
Test case:
massblist 1-2 b/blacklist
Expected: The first and second contact in the list will be blacklisted. If the contact is already blacklisted, then there will be no change to the contact. -
Test case:
massblist 0-2 b/unblacklist
Expected: No change in the address book. Error details shown in status message. -
Other incorrect massblacklist commands to try:
massblist,massblist 3-4
Expected: Similar to previous.
-
Changing to dark mode
-
Change the mode of view to dark mode
-
Test case :
dark
Expected: Mode of view is now in dark mode. -
Test case :
dark 1234
Expected: Mode of view is now in dark mode. -
Other dark commands to try:
dark light,dark delete 1,...(any additional input after dark).
Expected: Similar to previous.
-
Changing to light mode
-
Change the mode of view to light mode
-
Test case :
light
Expected: Mode of view is now in light mode. -
Test case :
light 1234
Expected: Mode of view is now in light mode. -
Other light commands to try:
light dark,light delete 1,...(any additional input after light).
Expected: Similar to previous.
-
Collecting details from all listed contacts
-
Collecting details while some contacts are being shown
-
Prerequisites: List some contacts using the
listorfindcommands. At least 1 contact in the list. -
Test case:
collect e/
Expected: Emails of all the contacts in the list are collected, separated by;. The result is shown in the status message. -
Test case:
collect e/ s/,
Expected: Emails of all the contacts in the list are collected, separated by,. The result is shown in the status message. -
Test case:
collect
Expected: No details are collected. Error details are shown in the status message. -
Other incorrect collect commands to try:
collect m/,collect n/ e/,...(trying to collect multiple types of details at once).
Expected: Similar to previous.
-
Deleting a contact
-
Deleting a contact while all contacts are being shown
-
Prerequisites: List some contacts using the
listorfindcommands. At least 1 contact in the list. -
Test case:
delete 1
Expected: First contact is deleted from the list. Details of the deleted contact are shown in the status message. -
Test case:
delete 0
Expected: No contact is deleted. Error details are shown in the status message. -
Other incorrect delete commands to try:
delete,delete x,...(where x is larger than the list size)
Expected: Similar to previous.
-
Deleting multiple contacts
-
Deleting multiple contacts while some contacts are being shown
-
Prerequisites: List some contacts using the
listorfindcommands. At least 2 contacts in the list. -
Test case:
massdelete 1-2
Expected: The first and second contact in the list will be deleted. -
Test case:
massdelete 0-3
Expected: No change in the address book. Error details shown in status message. -
Other incorrect massdelete commands to try:
massdelete,massdelete 3-
Expected: Similar to previous.
-
Editing remark for a contact
-
Editing the remark for a contact while some contacts are being shown
-
Prerequisites: List some contacts using the
listorfindcommands. At least 1 contact in the list. -
Test case:
remark 1 r/Absent
Expected: The remark of the first contact in the list will be changed to ‘Absent’. If the contact has an existing remark, the old remark will be replaced with the new remark. Details of the updated contact shown in the status message. -
Test case:
remark 2
Expected: No contact is edited. Error details are shown in the status message. -
Other incorrect remark commands to try:
remark,remark x,...(where x is larger than the list size)
Expected: Similar to previous.
-
Finding contacts
-
Finding contacts with details matching the keywords provided
-
Prerequisites: List all contacts using the
listcommand. Multiple contacts in the list. -
Test case:
find n/Alex Bernice
Expected: A list of contacts whose name containsAlexorBernice. The filter is case-insensitive, soAlexwill match withaLeXtoo, for instance. -
Test case:
find t/friends NEIGHBOUR
Expected: A list of contacts whose tags containfriendsorNEIGHBOUR. -
Test case:
find n/Alex Bernice t/friends neighbour
Expected: A list of contacts whose name containsAlexorBerniceand tags containsfriendsorneighbour. -
Test case:
find
Expected: No filtering is done, and the original list is presented. Error details shown in the status message. -
Other incorrect find commands to try:
find n/,find t/,...
Expected: Similar to previous.
-
Navigating through commands
-
Navigating to previous commands
- Test case: Execute
light,edit 1 n/Alex,find n/Alexin this order and press up arrow key three times.
Expected: The commands above are shown in the command box in the reverse order, i.e.find n/Alex,edit 1 n/Alexand finallylight.
- Test case: Execute
-
Navigating to later commands
-
Prerequisites: Perform test case 1.i.
-
Test case: Press down arrow key.
Expected: The commandedit 1 n/Alexis shown. -
Test case: Press down arrow key again.
Expected: The commandfind n/Alexis shown. -
Test case: Press down arrow key again.
Expected: The commandfind n/Alexis shown again since this is the last command executed.
-
-
Attempting to navigate through commands when there are no commands executed
-
Test case: Press up arrow key.
Expected: Nothing is shown in the command box. -
Test case: Press down arrow key.
Expected: Similar to previous.
-
-
Attempting to navigate to later commands after executing a command
- Test case: Execute any command and press down arrow key.
Expected: Nothing is shown in the command box.
- Test case: Execute any command and press down arrow key.
Sorting entries by name
-
Sorting the contact list
-
Test case:
sort ascending
Expected: The entire contact list will be sorted by name in ascending alphabetical order. If only a partial list is currently being displayed, the partial list will also be sorted and displayed. -
Test case:
sort
Expected: No change in the address book. Error details are shown in the status message. -
Other incorrect sort commands to try:
sort 121,sort ascending ascending
Expected: Similar to previous.
-
Undoing previous operations
-
Undoing previous operations
-
Prerequisites: List all persons using the
listcommand. Multiple contacts in the list. -
Test case: Execute
add n/Andy p/81234567 e/andy@example.com a/somewhere over the rainbow, Singapore 069420 m/emailfollowed byundo.
Expected:Andyis no longer in the contact list afterundois executed. Command that is undone is shown in the status message. -
Test case: Execute
blacklist 2,find b/trueandundoin this order.
Expected: The second contact in the list is no longer blacklisted. Command that is undone (i.e.blacklist 2) is shown in the status message.
-
-
Attempting to undo when no changes were done to the contact list
-
Prerequisites: No commands have been executed before executing the following test cases.
-
Test case:
undo
Expected: An error stating there is nothing to undo is shown in the status message. -
Test case: execute
lightandundoin this order.
Expected: Similar to previous.
-